VALVE ADJUSTMENT
should work perfectly), Screwdriver, Sandpaper (400 and
600 grit), Notepad, Needlenose Pliers, Feeler Gauges (down
to at least .0015"), Flat Piece of Glass, Gaskets, and Shims
bike and could cause severe injury in the event of a crash. If you are at all unsure of your ability to perform
this procedure correctly, PLEASE do not attempt to do so.
have a shop manual on hand, and consult as many sources as possible before undertaking this job. I take no
responsibility if you damage your engine using this method. The methods for checking and adjusting valve
clearance on a 4v motor may vary at certain points, and I don't know where because I have never seen the
innards of a 4v motor.
Be sure to visit the links section, where I have links to other great valve articles.
the SOHC, 2-valve,
desmodromic valve actuation
system:
1. Opening (upper) rocker arm
2. Opening shim
3. Split rings (also called
retaining or half rings)
4. Closing shim
5. Closing rocker return spring
(takes the minute amount of
slack out of the rocker)
6. Closing (lower) rocker arm
7. Camshaft
8. Valve
A= Opener clearance
B= Closer clearance
as the dealer would have you believe. You just need time, patience, the right tools, and an attention to detail. Before you
start, don't assume that it is a one-day-type job (unless your dealer is really good and carries a stock of shims). I broke it
up into two days for checking/one day for changing, but it should only take a slow person (like myself) about six or seven
hours for disassembly, checking, changing, and reassembly if you can find the shim right away. I had to wait because my
dealer didn't have the shim (but that's better than waiting a month for an adjustment appointment). I get frustrated
easily, especially when my bike is out in the hot sun and I'm trying to reassemble it, which is why I broke it up into so
many parts.
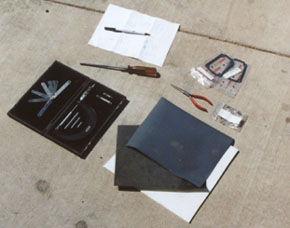
measuring the opener and closer shims), a feeler gauge that goes down
to at least .0015" (for measuring clearance), a screwdriver, new gaskets
for the valve covers (not absolutely necessary, but cheap insurance),
the shims you will replace, a piece of glass or very flat object, 400 and
600 grit sandpaper, a clean work area, fuel filter, timing belts, and
spark plugs if you want to replace them, and a lot of patience and time
set aside. You also need a basic set of metric tools. If you need to
measure the closer shim, you will also need a piece of metal stock to
help you. See Chris Kelley's Ducati page for more detailed info on that,
and see below for pictures of the shim in action.
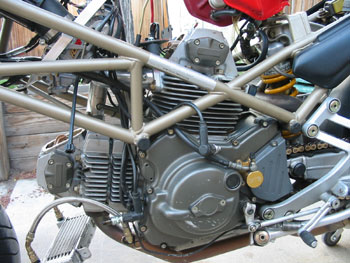
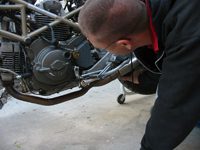
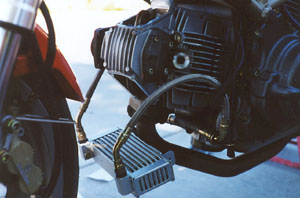
before removing the tank. (Supersports will require removal
of the rear shock) With the PCV hoses gone I had ample
room to work without removing the tank- crank breather
tube removal has definite advantages. The only thing I had
to do on mine was remove the battery and push back my box.
Take the belt covers, valve covers, and oil cooler off and place
the bike on a rearstand. If you have the stock battery box
you can still access the front vertical cover by taking out the
battery and pushing the rubber tray out of the way.
plugs. You need to remove the plugs so the engine can turn over
easier when trying to find Top Dead Center. This is a good time to
clean or replace the old ones.
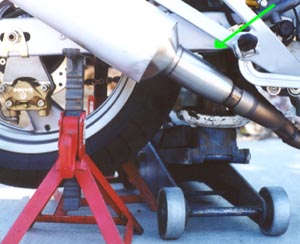
rear wheel. Take a jack, then place a piece of wood or similar
extension on the jack pad. Place the extension directly under the
front center of the swingarm, as shown. Then have a buddy sit on the
bike with his hand on the brake and holding it steady. Then, jack
the bike up and place jackstands under the swingarm on each side.
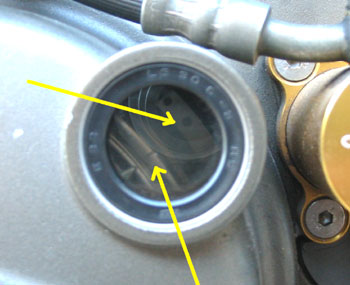
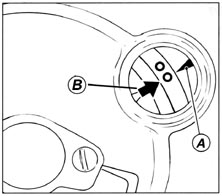
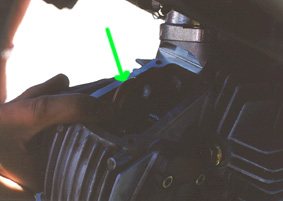
wheel while watching through the sight glass. Again, it's
impossible to get a good picture through that glass, but this is
what you are looking for. You want the arrow to line up with
the tickmark on the bottom half. It's much easier to see in
person. You need to spin the wheel very slowly, and it takes
some coordination to line up the ticks in the window exactly
because the engine rotates faster than the tire. Give it small
nudges, and it should be easy to line up then.
finding TDC. There is an arrow on the bottom left corner of the
sight glass, towards the front. This lines up with a tick mark on the
front portion of the flywheel. There is also an arrow in the upper
right corner, towards the back. This lines up with a dot on the back
(deep) part of the internal spinning piece. I just added the picture
below to show the two dots and arrow in the back a lot better, but it
doesn't show the front portion with the tickmark- confused yet?
They line up at the same time. When you find this mark, only one
of the cylinders is at TDC- you'll need to check the clearances of
each cylinder's valves to find out which one. When you spin it
around again and line them up, the other cylinder is at TDC. At
TDC, the valves are both closed and the piston is at the top of the
cylinder. Another helpful aid is that the horizontal cylinder has a
dot on the cam spinning gear that lines up with a raised nub on the
black rubber portion on the horizontal head when it is at TDC. One
more thing to throw you off- there are two TDC's per cycle on a 4
stroke engine, and the one at the end of the compression stroke is
the one you should measure on. The tick mark on the horizontal
cylinder cam gear that I was talking about may seem like it is at
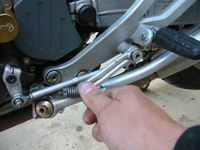
TDC, but may actually be at the wrong TDC. Before messing with a
certain valve shim, ALWAYS stick a screwdriver in the cylinder to
verify that the piston is there (you'll be able to feel the top of it) and
that the shim gaps are roughly equal. At BDC or the TDC on the
exhaust stroke, the measurements may be close enough to fool you,
but they'll throw you off. So make sure it's TDC on the
compression when you measure.
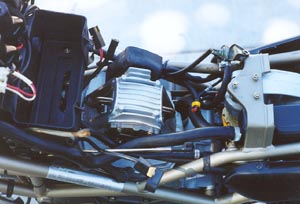
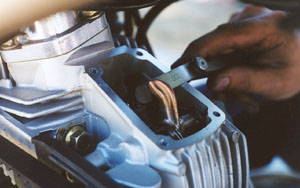
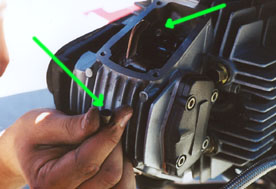
covers removed. This is what you're looking at. You may note
that I never said to remove the belt covers. Some articles say
you need to, but I found it unnecessary, unless you want to
adjust your belt tension while you're at it (which I didn't). It's
just easier to leave them on until you need to take them off.
take slack out of the spring. Then measure this clearance again.
It should be larger than the one before. In this case, it was .005".
This is also called the "loaded gap". This is where it gets tricky.
Take that measurement and subtract the first one (the opener
clearance) from that. That will give you your closer clearance, in
this case .0015". Consulting my clearance chart (below), you will
see that the opener is too tight (by.0005" at least), and the closer is
"too loose". However, in talking with many valve afficianados, I
have heard that the closers should not be worried about until they
hit at least .002", and can go up to .004" on a 2v (this is very
extreme and everybody uses different limits). As I have been told,
it is better to err on the loose side, which brings me to the opener
being too tight. This is caused by the valve wearing into it's seat
and pushing it further into the head, and hence further into the
rocker arm.
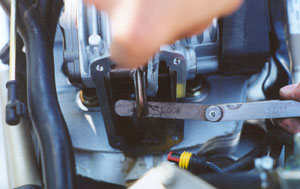
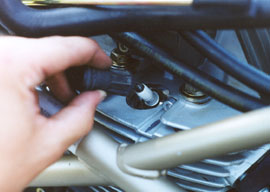
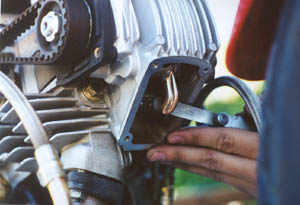
between the rocker arm and the opener shim. What feeling are
you looking for? The best way I have had it described to me is as
the way it feels if you stick the gauge in a phonebook. Try it-
you'll see that it goes in and out easily. You don't want snug or
hard resistance, that means it is too big. It should glide in and
out, but should still touch the surfaces on both sides. You'll just
have to try it and see. The vertical exhaust opener clearance
measured .0035". This clearance that you measured is the
opening shim's clearance, and doesn't need to be added or
subtracted from anything. This is also called the "unloaded gap".

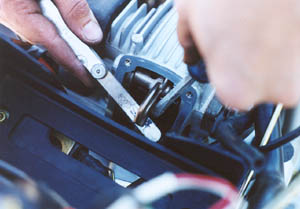
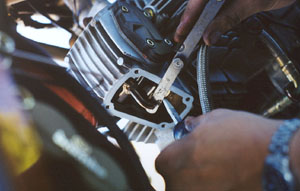
clearance on the intake valve (oops), but it's the same method as
the exhaust opener. This shot is of checking the closer clearance
on the intake valve, which was .0015 as well. The intake valve is
the valve on the side with the intake runner from the carb (black
valve stem seal). The exhaust valve is on the exhaust pipe side of
the head (green valve stem seal).
easier access here. You will need to move the oil
cooler out of the way, though.
cylinder on TDC. This one measured .0045", too
loose. This will require ordering a thicker shim to
reduce clearance.

one was .006", meaning the closer was
at .0015". Nothing to worry about yet.
Definitely too tight. This one will either require a new shim or
can be filed down to increase clearance, which is what I did.
You may also notice I went back on what I said about taking
off the belt covers. Hey- it was my first time and I didn't
know any better!
one was within spec at .0015".

within spec? You will need to remove the shims and measure them, using
those measurements as the basis for the new shim sizes (or how much you
will need to file the old ones down). Because my closers were all OK, I
didn't need to remove them, but that is only one more step once you have
the opener shims off (see below for more info). To remove the opener
shim, you must first remove the clip that holds the rocker arm in place.
Be sure when re-installing the clip that there is still the washer on each
side of the clip as before.
opening shim off of the valve.
do this, though, you must slightly rotate the engine to relieve pressure
on the rocker arm (actually I rotated it a lot, but everything I've read
says that it's only "slightly"). You're trying to get the cam to move
out of the way and let the rocker slide over. The intakes are hard
because by the time the cam is out of the way, the intake valve is
halfway through it's cycle. You can slide the rocker off, but you must
push the valve down to get the rocker to go back in it's original
position. Whatever you do, DON'T force anything. You could end up
breaking a very important piece in the valvetrain. If something seems
jammed, don't keep spinning the motor. Stop and evaluate exactly
what is causing the jam and try to reverse what caused it. I used the
rear wheel to do this. If you do remove the closer shim, it will allow
the valve to fall down, so you can't use the rear wheel method for
removing the closer, because the valve will fall into the cylinder,
leading to all kinds of trouble. If you need to remove the closer shims
to measure them, you can remove the timing belt and turn the cam
independently from the crankshaft, but be sure to stick something
like a screwdriver into the spark plug hole to keep the valve from
falling in.
measured .138". This was the loose one, so I needed to get a shim
that was .0015" thicker to match the other intake opener (.0035",
which is right on according to the intake opener specs). To find out
which shim from Ducati is .139", you must convert that to
millimeters- .1395" converts to an off number of millimeters, and
Ducati sells shims in sizes every .05 millimeters. The closest size
to the one I needed was 3.55mm, which converts to .13976". That
means it was thicker than needed, but I was going file it down
slightly. Also note- measure the shims before you leave the
dealer. They'll look at you funny, but you can't trust the marking
on the package (my supposed .13976" shim was actually .141",
luckily it was thicker so I could file it down).
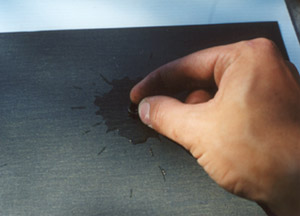
openers, because they were too tight. To file them down, I wet
sanded them on the flattest piece of glass I could find using 400 grit
paper, then polished them off with 600 grit. I would measure them
every thirty seconds or so with the micrometer, and when they
were close to the necessary size, I would put them in, re-install the
rocker, and measure clearance again at TDC. This requires the
time and patience that I mentioned earlier. After all, if you're not
going to do it right, why do it? It's also hard this way because you
may oversand and it will be too loose, but remember that it is OK
to err slightly on the loose side. You could also just order a close
size from Ducati, erring on the loose side. But this may make it
too loose (by .002" or more), so I just decided to sand them down.
likely it will be too loose, rather than too tight. You will need to get a tighter shim. But, how do you get it off? I
don't have pictures, but I can try to describe it. Once you have the opener shim off, you can start. First, secure the
valve below the rocker with something such as vicegrips or wire to prevent it from falling into the cylinder (which it
will want to do when the shim is removed). Now, rotate the crankshaft to allow you to push down on the closing
rocker (the lower one) and then push down on the closer shim to reveal the half/hale/split rings. You can then
remove the half rings that secure the shim using a magnet. A perfect pic of this is located in the article about valve
adjustment here. Now slide the shim off and measure it. It's really only one more step, but I didn't do it so I don't
have pictures. Also, with the opening rocker pushed over combined with trying to spin the crankshaft to allow you to
push down on the closing rocker, be ABSOLUTELY carfeul to avoid binding the opening rocker and the camshaft. For
detailed pictures of the closing shim removal/measuring, Chris Kelley's Ducati Tech is an excellent resource.
loose. Everything goes together easier, except the fuel lines (if you took the tank off). Be absolutely sure
that the lines don't get kinked when the tank is lowered. The fuel line should go back in a loop underneath
the tank mounting pad. It also may be a good idea to order some new valve cover gaskets for the
re-assembly. I replaced mine because I didn't want to worry about them, but the old ones were still good. If
you have any questions, feel free to e-mail me, and I'll be glad to help as much as I can. Good luck, and
remember to take your time and feel comfortable with the process before starting.
hurt to keep them on the high side (.004" for the intake openers, .005" for the exhaust openers, and .001" for the
closers). A clearance of .000" is possible, but very hard to obtain. .000" is a condition where there is no difference
between the loaded and unloaded gap. You cannot fit a feeler gauge in between the closing rocker (bottom) and the
closer shim, but can still turn the closer shim with your finger.
Intake openers: .003"-.004"
Exhaust openers: .004"-.005"
Intake closers: .000"-.001"
Exhaust closers: .000"-.001"
NOTE: 4v motors have a whole different set of clearances, on the looser side of the 2v. I am only listing them here as
reference.
Intake openers: .003"-.005"
Exhaust openers: .005"-.007"
Intake closers: .000"-.004"
Exhaust closers: .000"-.004"
views expressed herein are those of myself and do not reflect those of Ducati or its affiliates. The "DUCATI" logo and "Circle D" are
registered trademarks of Ducati Motor Holding, S.p.A., all other content on this website is copyright 2006, Monster Man Productions.